Add an Admin Panel To A NodeJs Project

As a developer, I like to work with NodeJS and MongoDB (I’ve also written about it before), but I usually have problems with manual administration. Long story short, it is difficult to manage database objects without having an admin panel. But now I found a NodeJS tool which can be used to create a simple admin panel for an existing or future project. In this article I will present this tool, so you too can easily setup an admin panel for your work projects. Just as I did in previous articles, I recommend you work side by side with this tutorial, making sure not to skip any important steps. Remember that Javascript’s ecosystem is very dynamic, with new ways to express yourself everyday, so future versions of these packages and steps presented may differ.
Nowadays, more and more web applications try to make your online life easier through admin panels. Many people use Twitter and Facebook or other social networks to communicate. As a reward, big networks are offering an API (Application Programming Interface) to help programmers create related web applications, usually through what is called an API Key. It is now easy to create web apps, with many tutorials showing you how to use an API key. All you have to do is come up with the app’s idea. So, after you have the application, what’s next?
I would say the next step is to add an Administration Panel. This is a must-have for a web app, and I want to come to your assistance by showing you the KeystoneJS tool. It is an open source framework which makes it easy to build such database-driven web applications and APIs in NodeJS. Under the hood, KeystoneJS uses the ExpressJS web server framework and a MongoDB database via the Mongoose object modelling framework.
Prerequisites
You’ll need a reasonable working knowledge of Javascript to use KeystoneJS, as well as familiarity with basic concepts such as databases and using node / npm.
Before you begin, make sure you have Node.js 0.10+ and MongoDB v2.4+ installed.
NodeJS
In short, NodeJS is Javascript running outside the browser, in this case on the server.
To install it, you can go to NodeJS Website. If you are using Mac and brew you can run brew install nodejs from a command line. In ubuntu, you can use nvm to install it. Here are the versions of NodeJS and npm which I use in this article; I recommend you make sure to run compatible versions.
node -v
# => v0.10.43
npm -v
# => 3.8.5
MongoDB
In this article I will use MongoDB to store data. MongoDB is a document-oriented NoSQL database (Big Data ready). It stores data in JSON-like format and allows to perform SQL-like queries against it.
You can install it by following the instructions here. If you have a Mac and brew it’s just: brew install mongodb && mongod . In Ubuntu you can try the following command: sudo apt-get -y install mongodb .
mongod --version
# => db version v2.6.11
This is the version of MongoDB which I use. I advise you again to make sure it is installed correctly and that your version is compatible to mine, in order to prevent any mishaps in following this tutorial.
KeystoneJS
We’ll be using the KeystoneJS generator made with Yeoman. In your root directory run:
npm install -g generator-keystone
Create Admin Panel
Before starting the project we need to ensure that MongoDB is running. We can then continue to create an admin panel for a project. To avoid wasting time, I will take an existent project and create its admin panel with KeystoneJS.
In the folder project’s root folder, we will add the admin panel with a keystone command:
yo keystone
Setting the project root at: /Todos
Welcome to KeystoneJS.
? What is the name of your project? (My Site) AdminPanel
We will set the folder and project name as AdminPanel. This mini-project is just for Admin Panel, since I personally prefer to keep such projects separate. This will help us debug by knowing the exact paths of each failure point.
? What is the name of your project? AdminPanel
? Would you like to use Jade, Swig, Nunjucks or Handlebars for templates? [jade | swig | n
unjucks | hbs] (jade)
For the Admin Panel’s layout I will use Jade, because it is my favourite in such projects, but you can select whichever template you prefer.
? Would you like to use Jade, Swig, Nunjucks or Handlebars for templates? [jade | swig | n
unjucks | hbs] jade
? Which CSS pre-processor would you like? [less | sass | stylus] (less)
CSS gimmicks are beyond the scope of this article, so let’s just select the Less CSS pre-processor. Of course you can select whatever you want.
? Which CSS pre-processor would you like? [less | sass | stylus] less
? Would you like to include a Blog? (Y/n) n
We don’t need blog for admin panel, so here is a justified choice.
? Would you like to include a Blog? No
? Would you like to include an Image Gallery? (Y/n) n
In case of you have a project with image gallery, here you will need to set yes, but for now let’s assume no images are needed.
? Would you like to include an Image Gallery? No
? Would you like to include a Contact Form? (Y/n) n
If providing access to the admin panel is necessary, perhaps you can use Contact Form, but in my case we don’t need it.
? Would you like to include a Contact Form? No
? What would you like to call the User model? (User) Admin
Because we only use this project for an admin panel, the only user type will be that of an Admin (regular user will not have access).
? What would you like to call the User model? Admin
? Enter an email address for the first Admin user: (user@keystonejs.com) paul.buda@algotech.solutions
Here we setup the first Admin user, so that we can use the admin panel after creating the project.
? Enter an email address for the first Admin user: paul.buda@algotech.solutions
? Enter a password for the first Admin user: (admin) pass123
Obviously we also need a password for our admin user.
? Enter a password for the first Admin user: pass123
? Would you like to include gulp or grunt? [gulp | grunt] gulp
After setting up all the data for our first admin, we need to chose gulp or grunt for easy task management. I will add my personal favourite, gulp, but of course it’s up to you what you like better.
? Would you like to include gulp or grunt? [gulp | grunt] gulp
? Would you like to create a new directory for your project? (Y/n) Y
We also need a new directory, since it is a stand-alone project.
? Would you like to create a new directory for your project? No
? ------------------------------------------------
    KeystoneJS integrates with Mandrill (from Mailchimp) for email sending.
    Would you like to include Email configuration in your project? (Y/n) n
Because with this project is just an admin panel for another project and we are the only people who will use this admin panel, we do not need to use Email configuration.
    KeystoneJS integrates with Mandrill (from Mailchimp) for email sending.
    Would you like to include Email configuration in your project? No
? ------------------------------------------------
    Finally, would you like to include extra code comments in
    your project? If you're new to Keystone, these may be helpful. (Y/n) Y
Unfortunately we are beginners in dealing with this framework, so we will set yes for comments in the code, so we can have that extra bit of helpful information. After we finish with the command and have the project for admin panel, we will start it to see what happens. First we will start the server and then we access localhost:3000
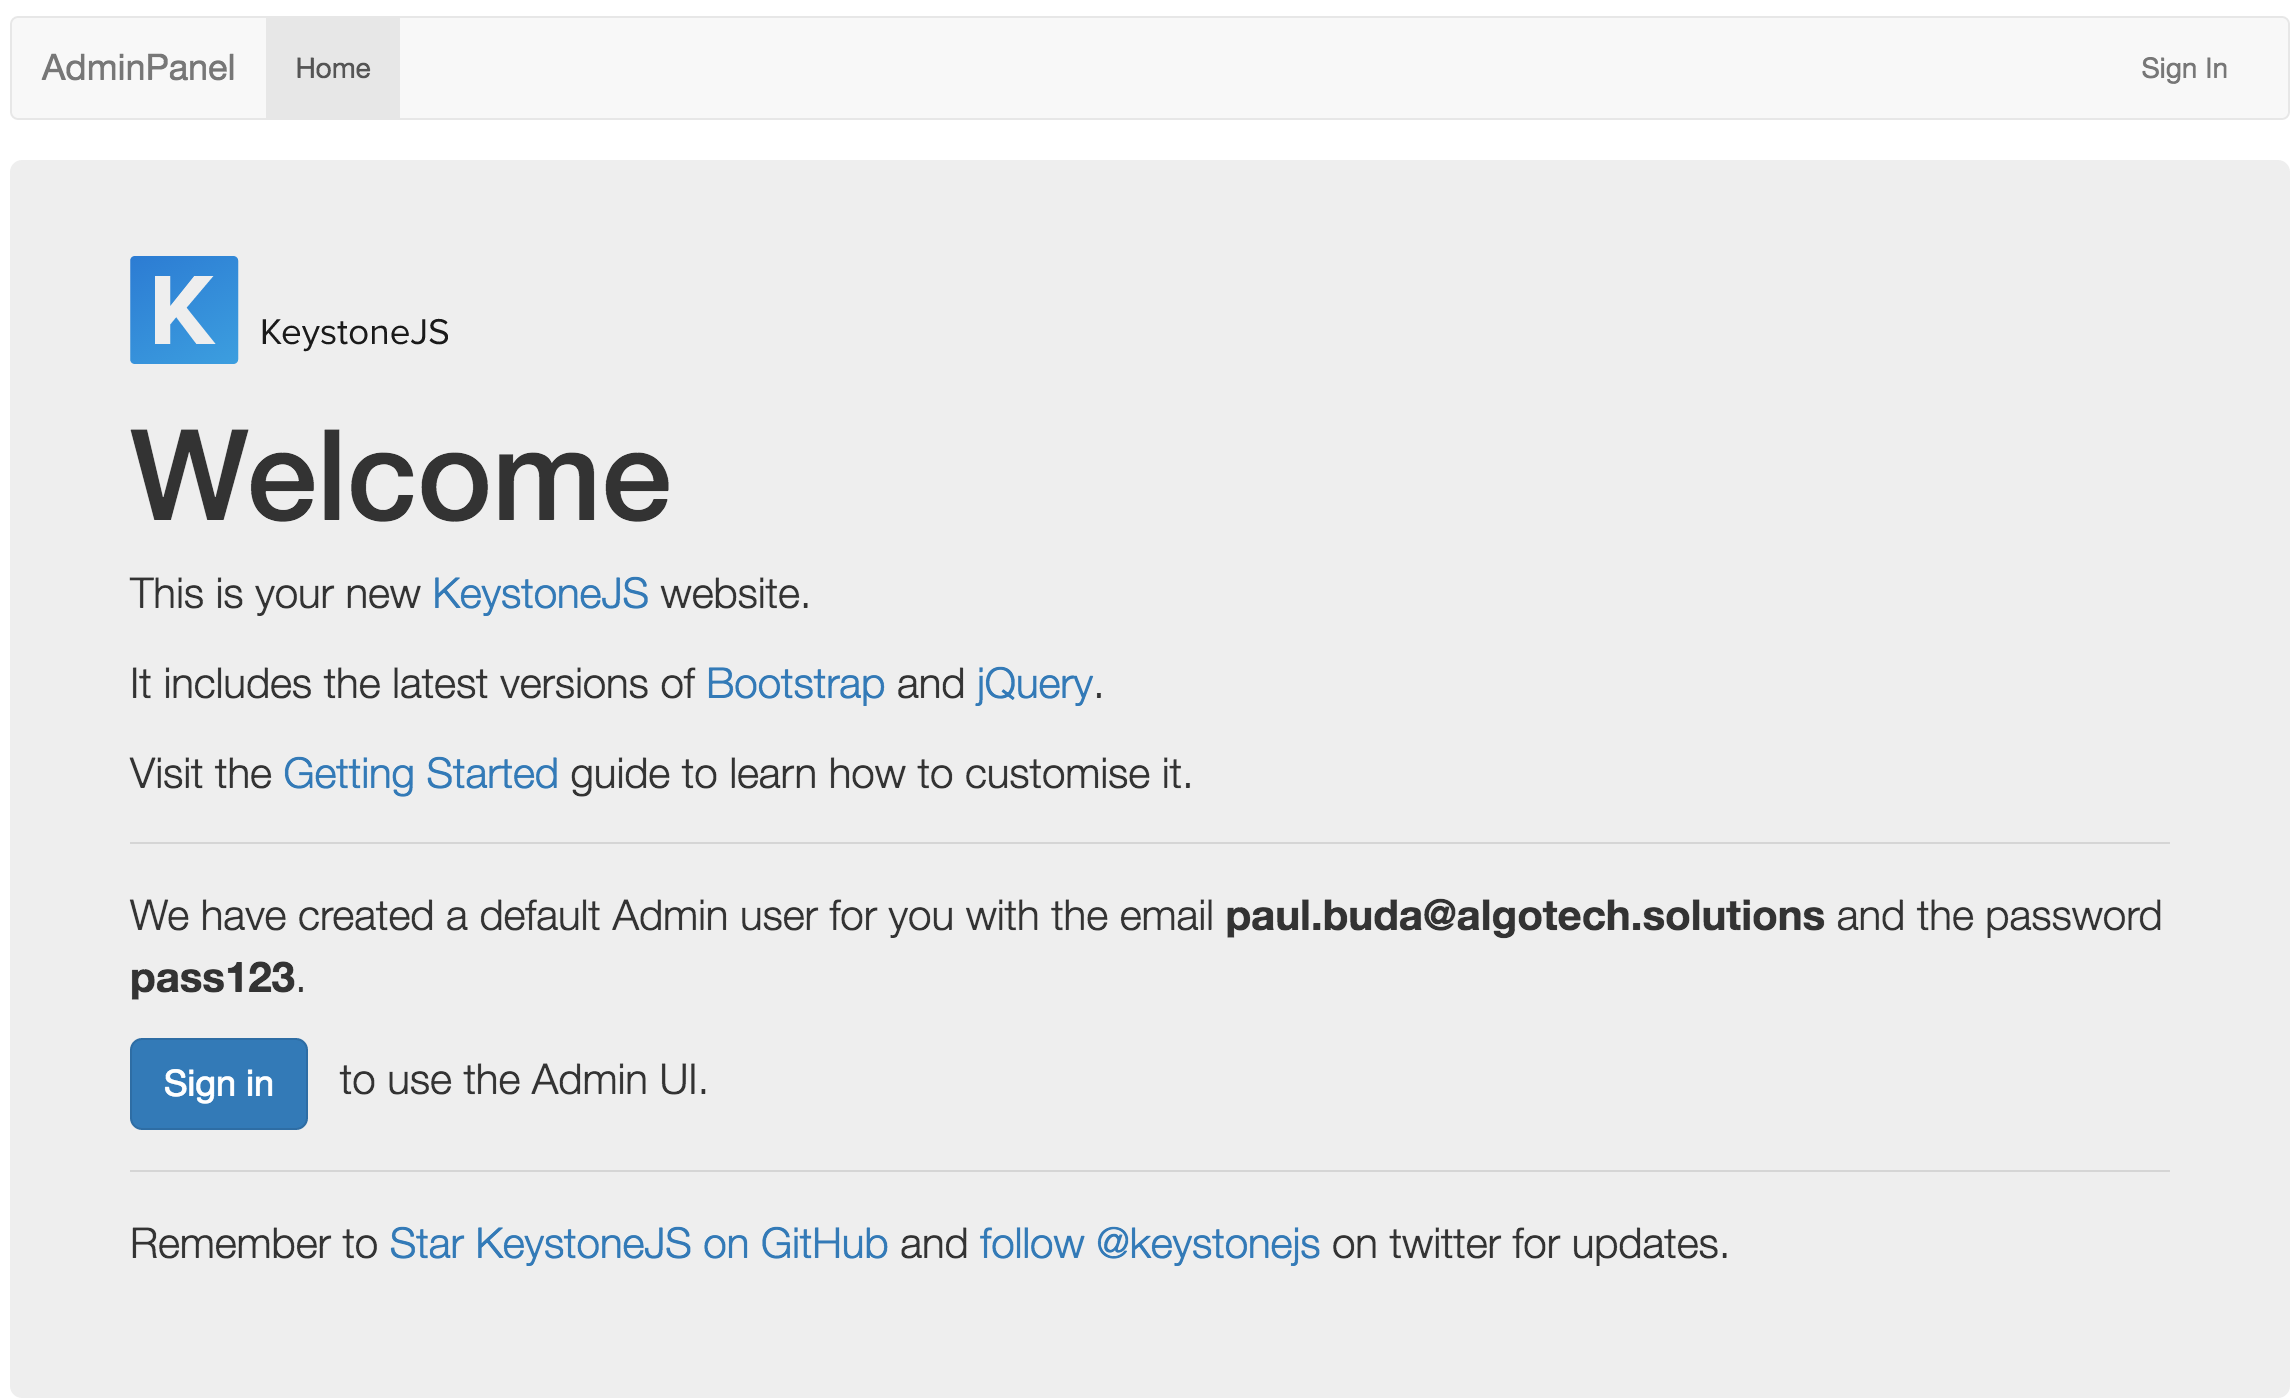
After going to localhost:3000 , we need just to follow the steps the server shows us.

Firstly, we login with the first admin user, created by the application. After logging in we will see the admin panel, but it is not yet exactly what we need.
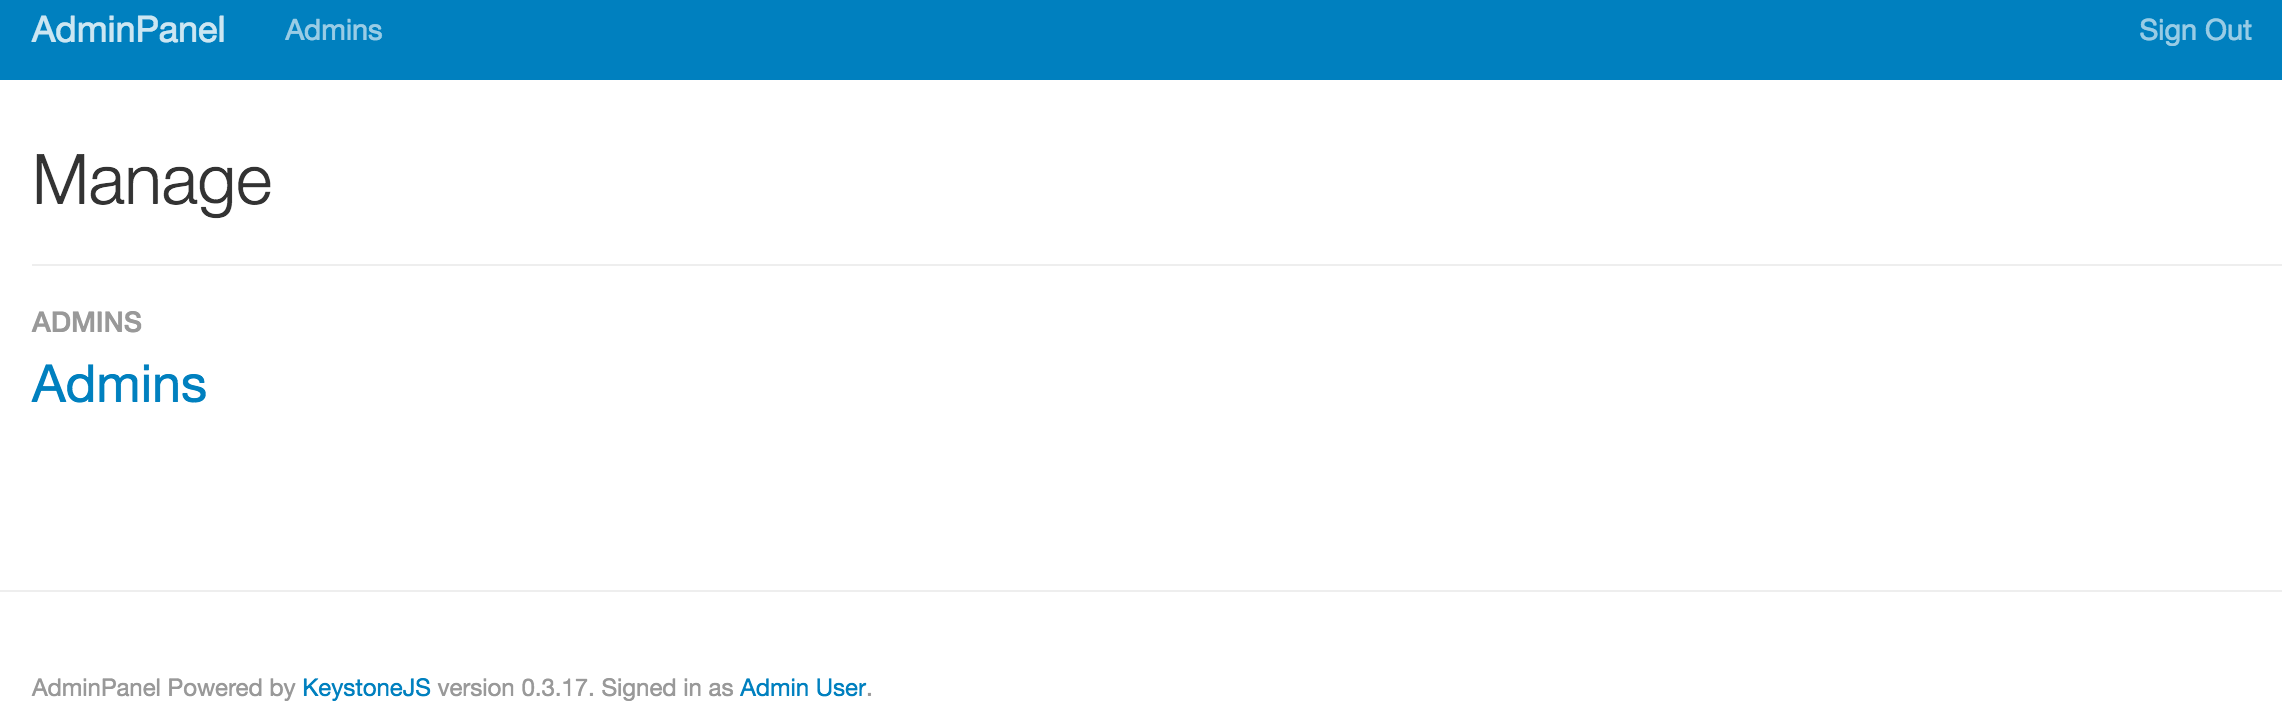
Here we can see only the Admins collection, but our target project’s database contains some other models as well. In my case, I would also want to be able to manage the Todos from the original project, and this collection isn’t here. To add that collection, we need to write some code and add the database and models to our admin panel project. First we need to open the .env file, which is in the root folder of the Admin Panel project, and add a new line MONGO_URI=mongodb://your-server/database-name . In case you will use same project as me, the .env file will look like:
COOKIE_SECRET=87c550797fdd382b7d1a0efca51a64c4f8914c65a4a9bf34a9bd1ab06bff711a723f73fdce5de43595ccfd40442593946af56d7bc3817424720e6f05c72f50ac
MONGO_URI=mongodb://localhost:27017/todosDB
The next step is to add main models in this project. In our case, we just need to add the Todos model. We need to create a model file in the models directory and after that write code for the model. In our case, the Todos model will be:
var keystone = require('keystone');
var todos = new keystone.List('todos');
todos.add({
  name: {
    type: String
  },
  completed: {
    type: Boolean,
    default: false
  },
  note: {
    type: String
  },
  update_at: {
    type: Date,
    default: Date.now()
  }
});
todos.register();
After we have all the models we need, we start the server again and we will see some new entries in our admin panel.

We now have a new collection in our admin panel. We can open the Todos and see what happens.

If you read my last article and remember the data we used, you will also recognize it here. Let’s try to add a new Todo in the database.
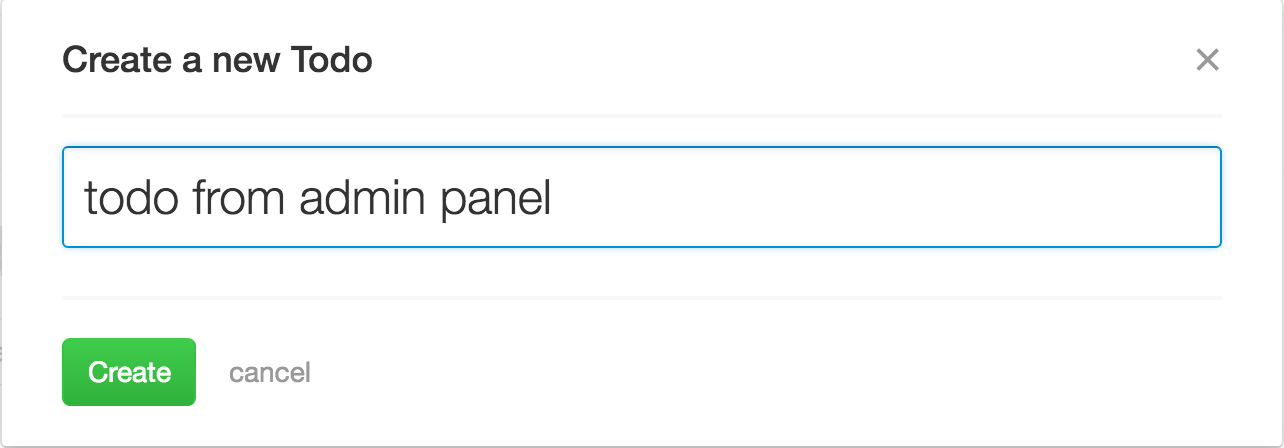
Complete all the Todo’s fields and save the object.
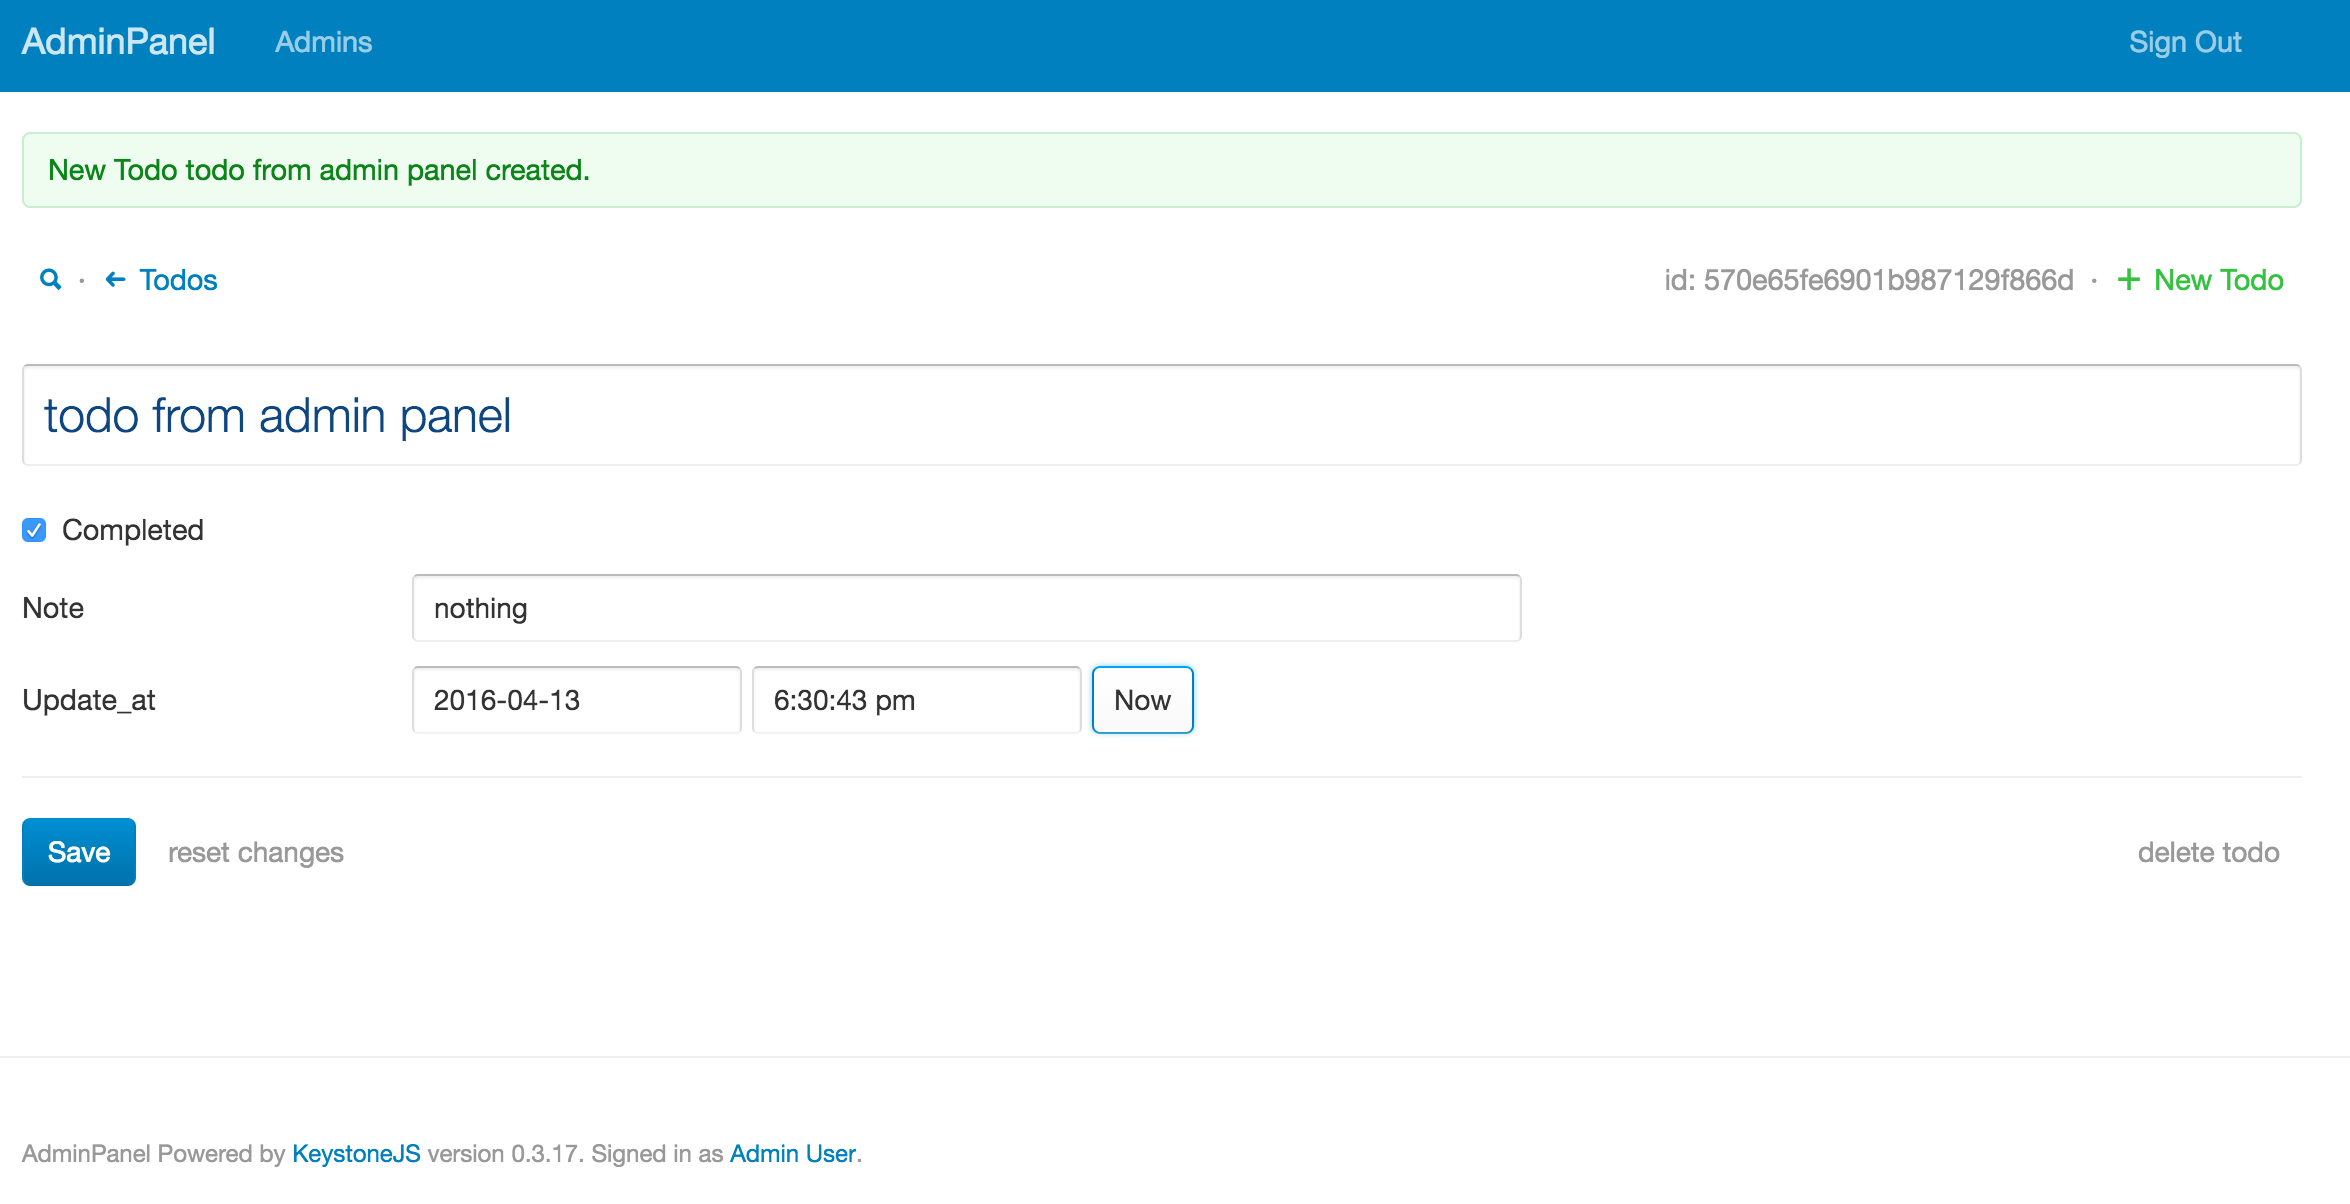 After we have saved the Todo object, we can check for its presence in the list.
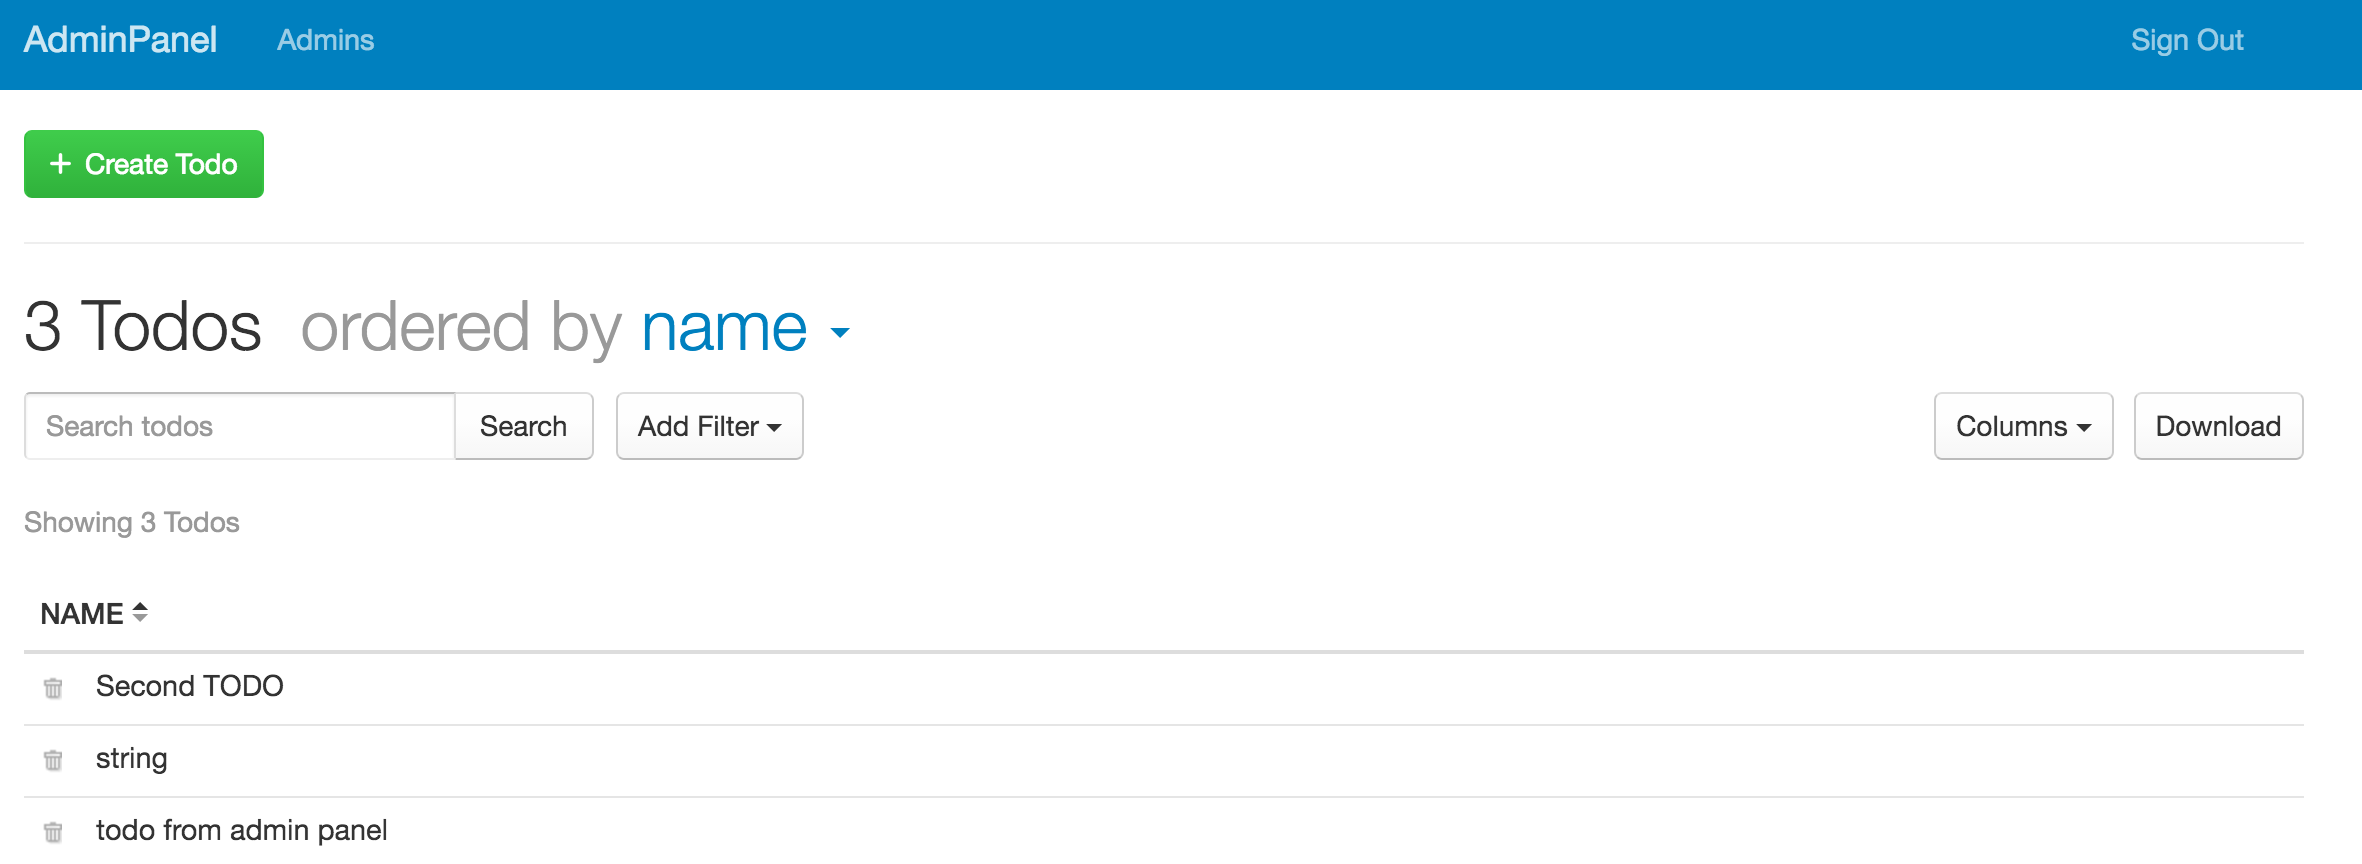
Now we can play with this admin panel, editing and deleting Todo objects. We can add more models and objects to the admin panel, and they can be observed both in this project and our main one. For this operation we just need to write model code, much like for our Todos model. To see more examples of what you can do with KeystoneJS, I recommend you access keystoneJS.
Conclusion
KeystoneJS is a NodeJS framework which uses MongoDB as a database and helps you automatically create admin panels for your projects. Through these panels, you can administrate MongoDB database objects and create, edit and delete items for other projects. If you will use this framework just for an admin panel like me, I recommend you to be mindful of caveats like fields mismatch from project and admin panel projects.
We transform challenges into digital experiences
Get in touch to let us know what you’re looking for. Our policy includes 14 days risk-free!
Free project consultation